antigravity-cli-tips
Antigravity CLI tips
Tip 1: Set up terminal aliases for quick access
To help you launch Antigravity CLI quickly, you can alias agy to just a.
To set this up, add this line to your shell config file (such as ~/.zshrc or ~/.bashrc):
alias a='agy'
I personally like to set up aliases for other tools I use often too, not just Antigravity. For example:
alias gb='github'  # GitHub Desktop
alias co='code'    # VS Code
Tip 2: Set up your custom status line
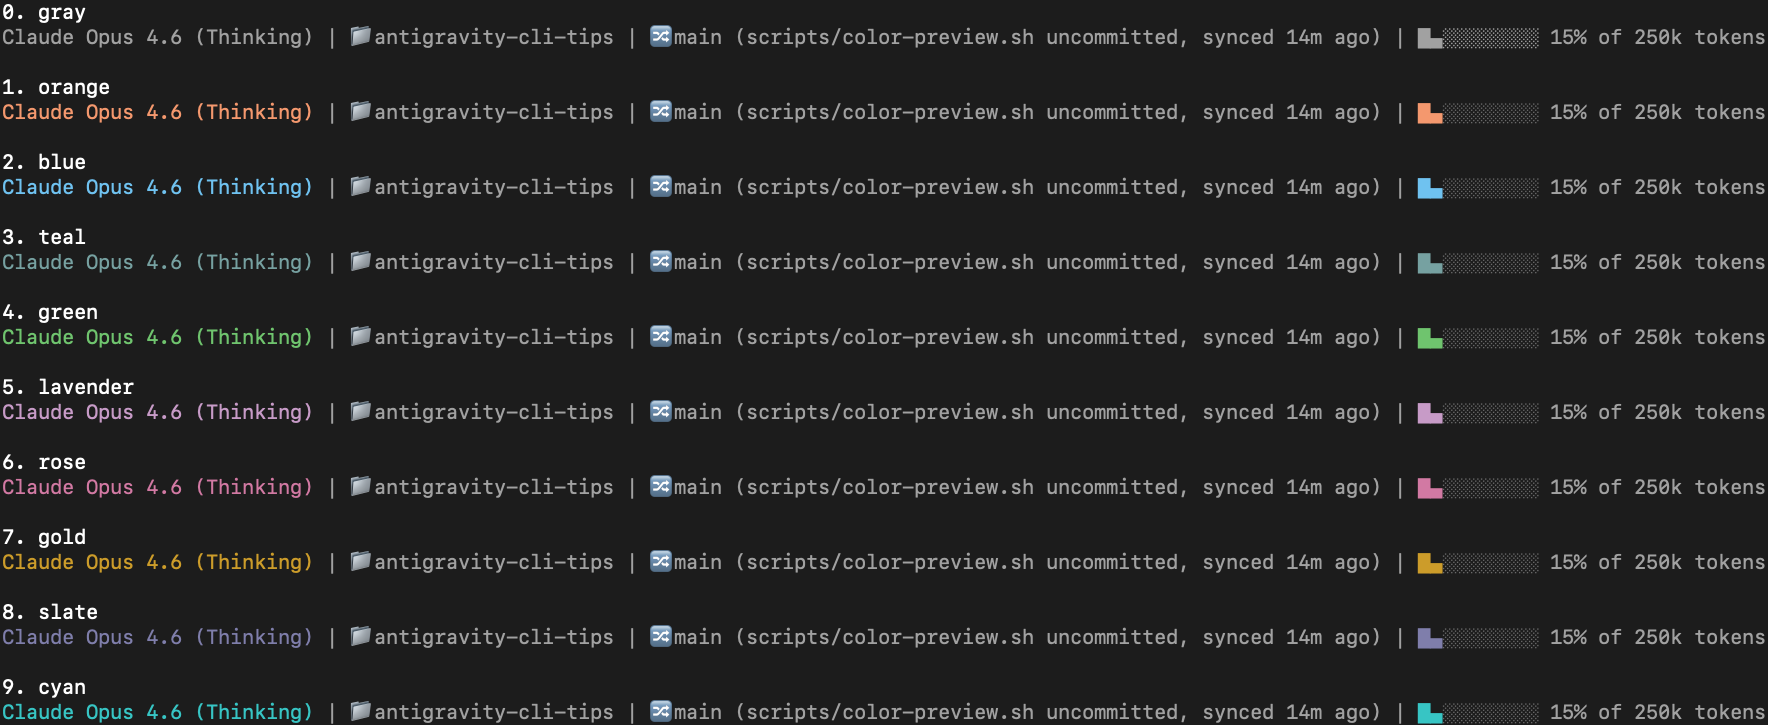
You can customize the status line at the bottom of Antigravity CLI to show useful info (see the official docs). For example, I built this script that shows the model, current directory, git branch, uncommitted file count, sync status with origin, and a visual progress bar for token usage:
Claude Opus 4.6 (Thinking) | 📁antigravity-cli-tips | 🔀main (scripts/color-preview.sh uncommitted, synced 14m ago) | █▄░░░░░░░░ 15% of 250k tokens
To set this up:
- Copy the script to your Antigravity CLI config directory:
mkdir -p ~/.gemini/antigravity-cli curl -o ~/.gemini/antigravity-cli/statusline.sh https://raw.githubusercontent.com/ykdojo/antigravity-cli-tips/main/scripts/context-bar.sh chmod +x ~/.gemini/antigravity-cli/statusline.sh - Add the following to your
~/.gemini/antigravity-cli/settings.json:{ "statusLine": { "type": "command", "command": "~/.gemini/antigravity-cli/statusline.sh" } }
The script supports 10 color themes (orange, blue, teal, green, lavender, rose, gold, slate, cyan, or gray). Edit the COLOR variable at the top of the script to change it.
It also adapts to narrow terminals by wrapping at natural breakpoints instead of getting cut off:
Claude Opus 4.6 (Thinking) | 📁antigravity-cli-tips
 | 🔀main (scripts/context-bar.sh uncommitted, synced 11m ago)
 | ░░░░░░░░░░ 0% of 250k tokens
Tip 3: Create a folder for your projects
I find it convenient to start Antigravity CLI from a single parent folder that contains my projects. That way, the agent automatically has access to any directory within it.
For example, I use a folder like this:
~/Desktop/antigravity-projects $
With my projects inside it, I can say things like “create a new project here,” “clone a new project here,” or “look at project A and apply certain features to project B” - all without extra permission prompts.
Tip 4: Set up AGENTS.md
AGENTS.md is a file you place in your project root to give Antigravity CLI persistent instructions. Anything you write in it gets included in every prompt within that directory. It’s great for things like coding conventions, project-specific rules, or how you want the agent to behave in general.
If you also use Claude Code, you can symlink CLAUDE.md to point to the same file so both tools share the same instructions:
ln -s AGENTS.md CLAUDE.md
You can also set up a global AGENTS.md at ~/.gemini/AGENTS.md for instructions that apply across all projects.
Tip 5: Talk to Antigravity CLI with your voice
I found that you can communicate much faster with your voice than typing with your hands. Using a voice transcription system on your local machine is really helpful for this.
On my Mac, I’ve tried a few different options:
- superwhisper
- MacWhisper
- Super Voice Assistant (open source, supports Parakeet v2/v3)
You can get more accuracy by using a hosted service, but I found that a local model is strong enough for this purpose. Even when there are mistakes or typos in the transcription, the AI is smart enough to understand what you’re trying to say. Sometimes you need to say certain things extra clearly, but overall local models work well enough.
I think the best way to think about this is like you’re trying to communicate with your friend. Of course, you can communicate through texts. But if you want to communicate faster, why wouldn’t you get on a quick phone call? You can just send voice messages. It’s faster, at least for me.
A common objection is “what if you’re in a room with other people?” In that case, I just whisper using earphones - I personally like Apple EarPods (not AirPods). They’re affordable, high quality enough, and you just whisper into them quietly. I’ve done it in front of other people and it works fine. In offices, people talk anyway - instead of talking to coworkers, you’re talking quietly to your voice transcription system. This method works so well that it even works on a plane. It’s loud enough that other people won’t hear you, but if you speak close enough to the mic, your local model can still understand what you’re saying.
Tip 6: Master different ways of verifying its output
One way to verify its output if it’s code is to have it write tests and make sure the tests look good and don’t just hardcode true. That’s one way, but you can of course check the code it generates as it goes. You can also use a visual Git client like GitHub Desktop for checking changes quickly. And having it generate a PR is a great way as well - have it create a draft PR, check the content before marking it as ready for review.
In addition, you can set up different ways for the agent to test your code in different formats. For example, if you’re building a web app, you can set up Playwright MCP and it’ll be able to use the browser to test your app all on its own. To set it up, add this to ~/.gemini/config/mcp_config.json:
{
  "mcpServers": {
    "playwright": {
      "command": "npx",
      "args": [
        "-y",
        "@playwright/mcp"
      ]
    }
  }
}
With this, the agent gets browser automation tools like browser_navigate, browser_click, and browser_take_screenshot, so it can open your app, interact with it, and visually check the result on its own.
Tip 7: Learn to use various CLI tools from the agent
For example, you can create a draft PR through the gh command, and once it’s created, you can ask the agent to open it in your browser with the open command so you can review it yourself. If you have a change you want to check quickly or fix manually, you can use the code command to open it in VS Code, or use the github command to open GitHub Desktop and see a visual diff. You can use ffmpeg for quick video editing, or ImageMagick for quick image editing and conversion. There are a lot of things you can do if you’re familiar with these CLI tools.
Tip 8: Attach images with Ctrl+V
You can attach an image from your clipboard to your prompt by simply pressing Ctrl+V.
Tip 9: Cmd+A and Ctrl+A are your friends
Sometimes you want to give Antigravity CLI a bunch of text from a webpage or terminal output. You can give it a URL, but another method is to just select all (Cmd+A on Mac, Ctrl+A on Windows/Linux), copy, and paste it directly into the CLI.
Some pages don’t lend themselves well to select all by default - but there are tricks to get them into a better state first. For example, with Gmail threads, click Print All to get the print preview (but cancel the actual print). For YouTube videos, click “Show transcript” and then Cmd+A or Ctrl+A.
Tip 10: Manage your to-do list in AGENTS.md
It’s convenient to keep a to-do list or project status in your AGENTS.md file. Since the agent reads it with every prompt, you can just ask “what’s on the to-do list?” and it’ll know exactly where things stand. You can also ask it to update the list as you make progress.
For example, you might have a section like this in your AGENTS.md:
## To-Do

### Done
- [x] Unity 3D URP project scaffold
- [x] Card hand UI with 7 cards at bottom of screen
- [x] Card hover effect (scale + blue outline highlight)
- [x] Card drag with placeholder in hand

### Up Next
- [ ] 3D world view - camera at an angled perspective looking down at a game field/board
Then you can just ask “what do we have for the to-do list” and it’ll give you a summary of what’s done and what’s next.
Tip 11: Pre-allow directories outside your project
By default, Antigravity CLI auto-allows reading and writing files inside your current project directory. But if you ask it to access files in a different directory, it’ll prompt you for permission every time.
You can fix this by adding those directories to the allow list in your ~/.gemini/antigravity-cli/settings.json (see the official docs):
{
  "permissions": {
    "allow": [
      "read_file(/Users/yk/Desktop/projects/massive-coop-roguelike)"
    ]
  }
}
Path matching is recursive, so allowing a directory covers all files and folders inside it. If you also want write access, add write_file too - and write_file implies read_file, so you don’t need both for the same path.
This also comes up when the agent edits its own config. For example, setting up an MCP server writes to ~/.gemini/config/mcp_config.json, which is outside your workspace, so it triggers a permission prompt. You can pre-allow it the same way:
{
  "permissions": {
    "allow": [
      "write_file(/Users/yk/.gemini/config/mcp_config.json)"
    ]
  }
}
Tip 12: Use realpath to point it at files in a different location
When you want to tell Antigravity CLI about files in a different folder, use realpath to get the full absolute path:
realpath some/relative/path
Then paste that absolute path into your prompt so it knows exactly where to look.
Tip 13: Skip permissions in isolated environments
If you’re working in an isolated environment - like a container, a VM, or a dedicated test machine - where you’re okay with the agent doing anything without asking, you can launch Antigravity CLI with:
agy --dangerously-skip-permissions
This auto-approves all tool permission requests without prompting.
For convenience, you can even add an alias like in Tip 1:
alias ad='agy --dangerously-skip-permissions'
Tip 14: Continue from a previous conversation
Two ways to pick up where you left off:
agy -c(or--continue) continues the most recent conversation/resumeinside a session opens an interactive picker of your past conversationsTip 15: Agentify your entire SDLC
It’s common to over-rely on agents like Antigravity to generate code, but it’s just as important to use them for the other parts of the software development lifecycle: understanding issues, designing solutions, reviewing PRs, and testing.
I made a video about this for the Google Cloud Tech YouTube channel, and there’s also a blog post version in this repo: